
Make Your Own Frame Saws
Experience Level: ANY
Instructor: Ryan Barnard
His Website
Moderator: Michael Gillette
Class Size: 10 Students
Sessions: 3 sessions at 5 hours each
This course will be via Zoom.
Course Description
Unlock the Secrets of Traditional Woodworking: Craft Your Own Frame Saws!
Are you ready to elevate your woodworking game and save money while doing it? Join Ryan Barnard for an exclusive online course that will revolutionize your approach to hand-tool woodworking and joinery!
In just three engaging sessions, you’ll learn to create all the essential saws for your woodworking arsenal:
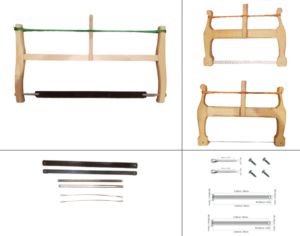
-300 MM Joinery Frame Saw
-450 MM Rip-Cut Frame Saw
-450 MM Cross-Cut Frame Saw
Imagine the satisfaction of crafting precision cuts with tools you’ve made yourself! Not only will you gain invaluable skills in mortise and tenon joinery, shaping wood, and finishing techniques, but you’ll also save hundreds of dollars compared to buying premium hand saws.
This course is perfect for beginners and experienced woodworkers alike. You’ll learn:
-Traditional woodworking techniques
-How to customize tools to your preferences
-The art of creating beautiful, functional saws
Don’t miss this opportunity to join a community of passionate craftspeople and take your woodworking to the next level. With Ryan’s expert guidance, you’ll be making professional-quality cuts in no time – using saws you crafted with your own hands!
Space is limited, so reserve your spot today and start your journey towards woodworking mastery!
Day Breakdown
Day 1: 300 MM Joinery Frame Saw (5 Hours)
- Introduction and Overview (30 minutes)
-Welcome and course objective
-Safety guidelines and tool familiarization
-Overview of the three Frame Saws to be made in the course
- Frame Saw Fundamentals (30 minutes)
-Lecture on the history, design, and use of frame saws
-Discussion of materials and design considerations
- Making the 300 MM Joinery Frame Saw (4 hours)
-Design & Layout (30 minutes): Marking out the arms, stretcher, and toggle.
-Cutting the Mortise and Tenon Joint (60 minutes): Step-by-step guidance on cutting and fitting.
-Bore the Mounting Holes (15 minutes): Drilling precise holes for blade mounting.
-Shape the Arms & Stretcher (45 minutes): Using rasps, files, or spokeshaves to shape components.
-Make the Toggle (20 minutes): Crafting and refining the toggle mechanism.
-Sanding, Scraping & Finishing (30 minutes): Preparing surfaces for assembly using boiled linseed oil or butcher block treatment.
-Assembly & Testing (30 minutes): Assembling the saw, tensioning the blade, and testing its functionality.
- Wrap-Up and Q&A (15 minutes)
Day 2: 450 MM Rip-Cut Frame Saw (5 Hours)
- Review and Q&A from Session 1 (15 minutes)
- Making the 450 MM Rip-Cut Frame Saw (4 hours 30 minutes)
-Design & Layout (30 minutes): Marking out parts specific to this larger saw.
-Make the Mounting Pins & Bore Mounting Holes (30 minutes): Creating pin-mounted blade holders for adjustability.
-Cutting the Mortise and Tenon Joint (60 minutes): Cutting and fitting joints for a larger frame.
-Shape the Arms & Stretcher (45 minutes): Refining shapes for comfort and usability.
-Make the Toggle (20 minutes): Crafting a toggle suited for tensioning a rip-cut blade.
-Sanding, Scraping & Finishing (30 minutes): Preparing all surfaces and applying finish for durability.
-Assembly & Testing (30 minutes): Assembling the saw, tensioning the blade, and testing its rip-cut performance.
- Wrap-Up and Q&A (15 minutes)
Day 3: 450 MM Cross-Cut Frame Saw (5 Hours)
- Review and Q&A from Session 2 (15 minutes)
- Making the 450 MM Cross-Cut Frame Saw (4 hours 30 minutes)
-Design & Layout (20 minutes): Marking out parts specific to this cross-cut saw design.
-Make the Mounting Pins & Bore Mounting Holes (20 minutes): Creating pin-mounted holders for a fixed cross-cut blade.
-Cutting the Mortise and Tenon Joint (45 minutes): Precision cutting and fitting of joints for this saw frame.
-Shape the Arms & Stretcher (45 minutes): Refining shapes to ensure comfort during cross-cutting tasks.
-Make the Toggle (15 minutes): Crafting a toggle mechanism tailored for this saw’s needs.
-Sanding, Scraping & Finishing (30 minutes): Preparing surfaces for assembly with finishing techniques.
-Assembly & Testing (30 minutes): Final assembly of all components, tensioning of blade, and testing its cross-cut performance.
- End-of-Course Wrap-Up and Survey (15 minutes)
-Review of all three completed projects
-Discussion of the next steps in woodworking
-Feedback survey
Tools & Materials Needed
Required Tools:
0.5 Mechanical Pencil
Medium OR Fine point black permanent marker
Marking Knife OR Awl
Smoothing Plane OR Block Plane
1/4” & 1” Chisels
Half-round Rasp
Half-Round File
Triangle File
120 & 220 Grit Sandpaper OR Card Scraper
Electric Drill OR Bit Brace
3/32” or 2.5 MM Twist Drill Bit or Brad Point Bit
1/4” or 6 MM Twist Drill Bit, Brad Point Bit, or Spade Bit
Sawset, Saw Wrest OR Nail Set and Hammer
Recommended Tools:
Spokeshave
Rat-Tail Rasp
Rat-Tail File
Countersink Bit
Vise OR Hand-screw Clamp
Needle Nose Pliers
*Materials/Hardware students need to obtain:
QTY: 2 Item: 3/4“ x 1-1/2” x 9” Hardwood (Like this )
QTY: 1 Item: 3/4” x 1-1/2” x 11-1/2” Softwood (Like this )
QTY: 4 Item: 3/4” x 1-1/2” 12” Hardwood (Like This)
QTY: 1 Item: 3/4” x 1-1/2” x 21-3/4” Softwood (Like this)
QTY: 1 Item: 3/4” x 1-1/2” x 16-1/2” Softwood (Like this)
QTY: 1 Item: 5/8” x 5/8” x 5” Square Hardwood Dowel (Like This)
QTY: 2 Item: 5/8” x 5/8” x 7” Square Hardwood Dowel (Like This)
QTY: 80’ Item: Mason Line or other string (Like This) OR (Like This)
Boiled Linseed Oil (Like This) & Paste Wax (Like this)
Butcher Block Treatment (Like this)
*Students may use any wood they would like to for this class. Generally, you want to use a hardwood for the arms and toggle for strength and durability, and a softwood for the stretcher to reduce weight, but softwood works well for the entire frame if pricing or availability is of concern. Additionally, students may substitute Waxed Linen Thread for Mason Line if they prefer a more historical option. Students need to review the attached patterns and select the design that they prefer based on ergonomics and believe they can make based on their current skill level.
Materials in Hardware Pack:
QTY: 1 Item: 300 MM x 12 MM – 14 TPI Hacksaw Blade (For Wood)
QTY: 1 Item: 300 MM x 12 MM – 18 TPI Hacksaw Blade (For Wood or Metal)
QTY: 2 Item: 300 MM – Spiral Cut Blade (For Coping or Fret Work)
QTY: 1 Item: 450 MM x 25 MM – 7 TPI Saw Blade (For Rip-Cut)
QTY: 1 Item: 450 MM X 20 MM – 12 TPI Saw Blade (For Cross-Cut)
QTY: 2 Item: 6 MM X 90 MM Clevis Pins
QTY: 4 Item: 2 MM X 10 MM Cotter Pins
QTY: 4 Item: #5 x 5/8” Wood Screw
Course Dates
3 Day Course:
-May 31st, June 1st, and June 7th, 2025: 1:00 p.m. – 6:00 p.m. EST (12:00 p.m. – 5:00 p.m. CST)