
Introduction to Frame and Panel Joinery
Experience Level: Intermediate
Instructor: Ryan Barnard
His Website
Moderator: Eric Hovan
Class Size: 10 Students
Sessions: 1 sessions at 5-6 hours
This course will be via Zoom.
Course Description
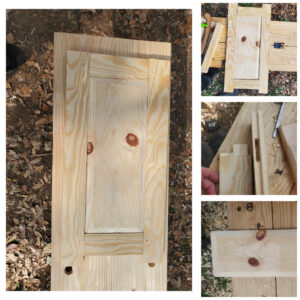
Learn the time-honored craft of frame and panel construction using traditional hand tools. This immersive class teaches students how to build a strong, functional, and visually striking frame and panel assembly — a foundational technique used in cabinetry, furniture making, and architectural woodwork.
Participants will craft a complete frame and fielded panel using mortise and tenon joinery, including the specialized haunched tenon and the historical drawbore method for mechanical strength. Students will also learn to groove rails and stiles to accept a raised panel and shape the panel with classic hand-tool techniques.
By the end of the session, each student will have a fully assembled and drawbored frame and panel assembly, as well as the confidence to integrate this technique into their own furniture and woodworking projects.
Class Agenda
1. Introduction and Overview (15–30 minutes)
- Welcome and safety briefing
- Objectives of the class
- Applications of frame and panel joinery
- Tools and materials overview
2. Marking, Measuring, and Layout (30 minutes)
- Introduction to essential layout tools
- Marking stiles, rails, grooves, and mortises
3. Field a Panel (45 minutes)
- Defining a fielded panel
- Beveling and fielding the panel using hand planes
- Managing seasonal wood movement and panel fit
4. Make a Groove Joint (30 minutes)
- Cutting grooves with a plow or combination plane
- Depth control and alignment with panel
- Avoiding tear-out and misalignment
5. Cut Stiles and Rails to Length (20 minutes)
- Calculating length accounting for tenons and panel fit
- Accurate sawing and squaring ends
6. Cut Haunched Mortise and Tenon Joints (1 hour)
- Mortising by hand with mortise chisels
- Sawing tenons and cutting haunches
- Fitting and refining tenons for clean joinery
7. Test Fit Assembly and Adjust (30 minutes)
- Assembling frame dry for square and fit
- Checking panel fit and expansion gaps
- Making necessary corrections
8. Drawbore Mortise and Tenon Joints (45 minutes)
- Drilling offset holes in mortise and tenon joint
- Shaping drawbore pegs
- Driving pegs to lock the joint mechanically
9. Questions, Comments, and Closing Remarks (15 minutes)
- Review of skills and techniques
- Student Q&A and project applications
Tools & Materials Needed
Required Tools:
- Measuring Tape or 24”-36” Rule
- Marking Knife or Scratch Awl
- Marking Gauge or Mortise Gauge
- Try Square or Combination Square
- ¼” Bevel Edge Chisel or Mortise Chisel
- 1” Chisel
- Mallet
- Tenon Saw or Dovetail Saw
- Block Plane or Smoothing Plane
- Bit Brace or Dill with ¼” bit
- Plow, Grooving, or Combination Plane with 1/4″ blade
Optional Tools:
- Carcass or Sash Saw
- Shoulder Plane or Router Plane
Required Materials:
- Stiles QTY: 2 Item: ¾” x 2-1/2” x 25”
- Rails QTY: 2 Item: ¾” x 2-1/2” x 9”
- Panel QTY: 1 Item: ¾” x 7-1/4” x 18”
- Pegs QTY: 4 Item: ¼” x 3”
Course Dates
July 26th, 2025 from 11:00 a.m. to 5:00 p.m. ET (10:00 a.m. – 4:00 p.m. CT / 8:00 a.m. – 2:00 p.m. PT)